
anti static mat

anti static mat
Electrostatic discharge (ESD) is a hidden hazard of electronics that is common. Certain sensitive components, such as PCBs, semiconductors and integrated circuits, can be permanently damaged by a simple static shock, usually one that goes unnoticed by people.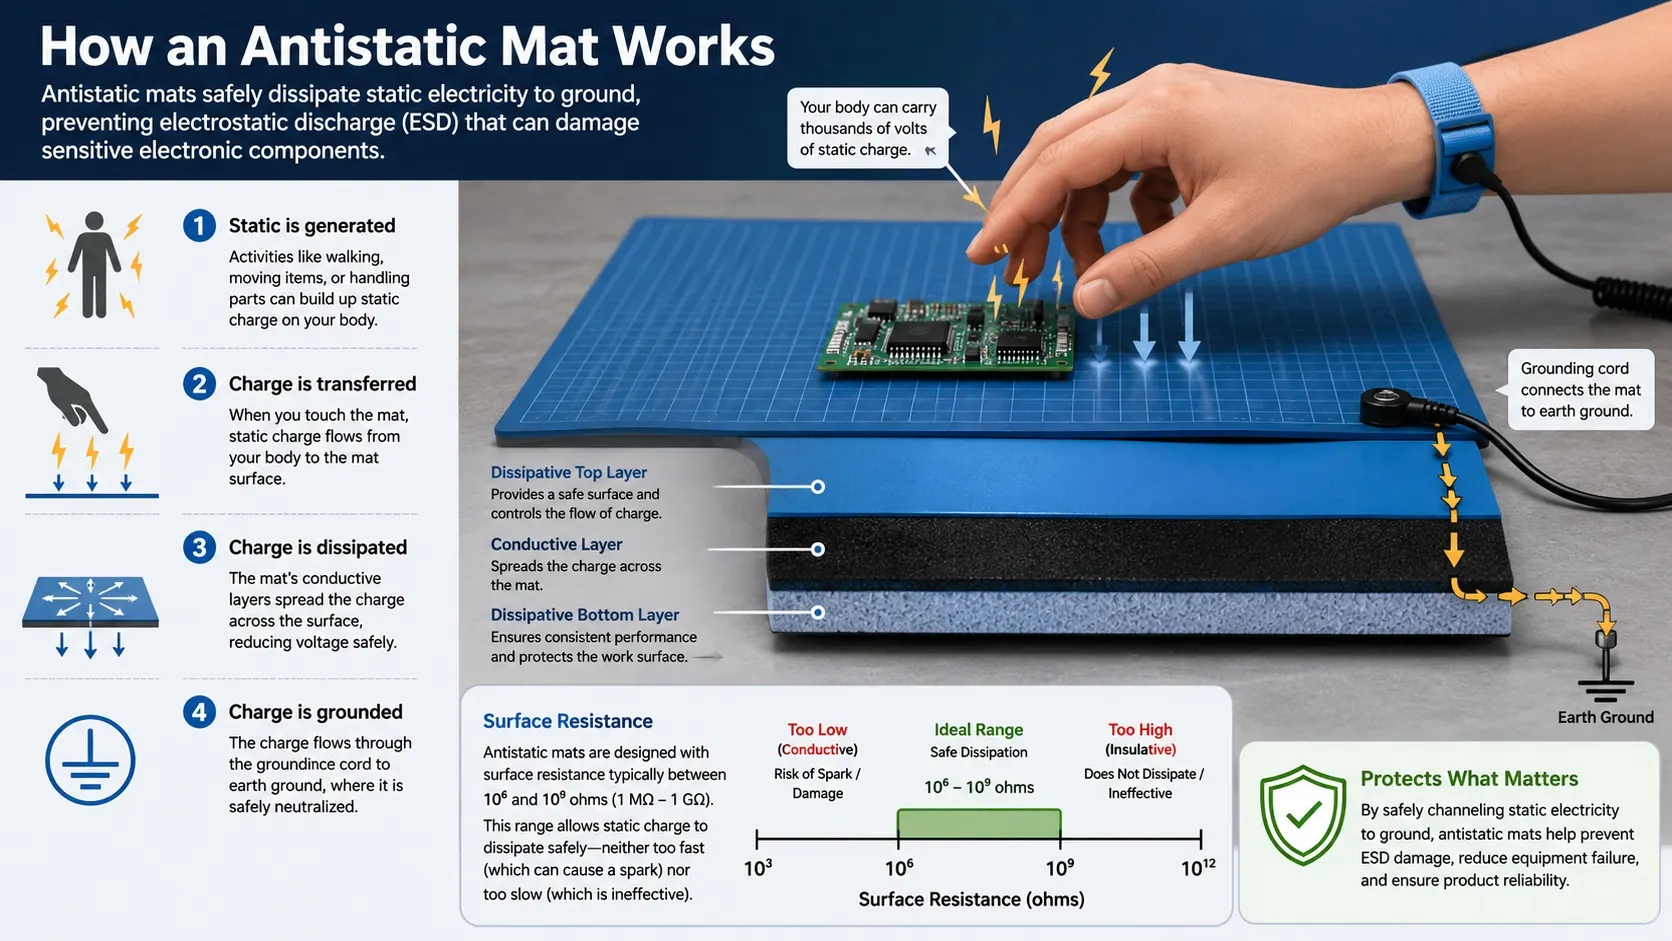
An antistatic mat, otherwise known as an ESD mat, is one of the key tools that is used to eliminate this damage by safely grounding static electricity. This guide teaches you the proper use of an antistatic mat, how it works and how to create a completely ESD-safe workspace.
What Is an Antistatic Mat?
ANTISTATIC MAT is an antistatic work surface that controls electrostatic charges. It's not just a regular rubber or silicone mat that drains away static electricity gradually, over time, instead of allowing it to spark.
These mats are often used in professional electronics applications to establish an ESD Protected Area (EPA) in assembly lines, repair stations and clean electronics workshops.
If the mat is grounded properly, this mat is a safe route for static electricity to dissipate both from the worker and sensitive components.
How an Antistatic Mat Works
An ESD mat does not “remove” static by itself. It works through three key principles:
1. Controlled Dissipation
All the materials used to produce the mat are static dissipative so that charges will flow slowly, not instantly.
2. Grounding Path
A grounding cord is attached to the mat, and it has a verified earth ground that provides a path for static electricity to ground out of the workspace.
3. Potential Equalization
With wrist strap, the worker, the tools and the components are given a potential equal to that of the electrical source, thus avoiding any unintended discharge between them.
Step-by-Step: How to Use an Antistatic Mat Correctly
Step 1: Prepare and Clean Your Workspace
Before installation:
- Clear the table or workbench completely
- Wipe the surface to remove dust, oil, or debris
- Ensure the area is dry and stable
A clean base ensures stable electrical contact and prevents resistance issues.
Step 2: Place the Mat on the Work Surface
Lay the ESD mat flat on your workstation:
- Avoid folding or curling edges
- Ensure full contact with the table
- Position it where you will handle components most often
For larger workstations, the mat should cover the entire working zone to create a consistent ESD-safe area.
Step 3: Install the Grounding Snap
Most mats use a snap connector:
- Install the snap near the edge of the mat
- Ensure it fully pierces and locks into the material
- Connect the grounding cord to the snap
This snap becomes the central grounding point of your ESD system.
Step 4: Connect the Mat to Earth Ground
Attach the grounding cord to a verified ground point such as:
- A grounded electrical outlet (center screw)
- Dedicated ESD grounding terminal
- Facility grounding bus bar
⚠️ This step is critical. Without grounding, the mat provides little to no ESD protection.
Step 5: Add a Wrist Strap (Strongly Recommended)
For proper ESD control:
- Wear an antistatic wrist strap
- Connect it to the mat’s common grounding point
This ensures your body and the mat remain at the same electrical potential, preventing discharge when touching components.
Step 6: Verify Grounding
Use an ESD tester or multimeter to confirm:
- Mat is properly grounded
- Resistance is within safe dissipative range
- No loose or broken connections
Typical safe resistance range for ESD mats is around 10⁶ to 10⁹ ohms, which allows controlled discharge without sudden sparks.
Best Practices for Antistatic Mat Usage
Keep the Mat Clean
Dust, flux, oil, or chemical residue can affect conductivity. Clean regularly using ESD-safe cleaners.
Avoid Insulating Objects
Do not place thick plastic sheets or insulating materials on top of the mat during operation.
Do Not Daisy Chain Mats
Each mat should have its own dedicated ground connection for reliable protection.
Combine with Full ESD Protection
For best results, use:
- Wrist strap
- ESD-safe tools
- Antistatic packaging
- ESD footwear (for floor setups)
Common Mistakes to Avoid
Many ESD failures come from incorrect usage:
❌ Using the mat without grounding
❌ Thinking color alone means ESD-safe
❌ Not using a wrist strap during sensitive work
❌ Skipping resistance testing
❌ Connecting to unreliable ground points
A mat only works when it is part of a complete grounded system.
Where Antistatic Mats Are Used
Antistatic mats are widely used in:
- Electronics manufacturing
- PCB repair stations
- Semiconductor assembly
- Computer hardware repair
- Cleanrooms
- Lab environments
Anywhere sensitive electronics are handled, ESD control is essential.
Why Proper ESD Control Matters
Even a small static discharge can:
- Destroy microchips instantly
- Cause hidden latent defects
- Reduce product lifespan
- Increase repair and warranty costs
That is why a professional ESD setup abides by strict standards such as ANSI/ESD S20.20.
Final Thoughts
It is not a difficult task to use an antistatic mat correctly, but it should be used in the systematic way. The trick is not only to set up the mat on your desk, but to ground, verify and utilize with a complete ESD control system.
Properly installed, an ESD mat is one of the best and cheapest ways to protect electronics work from invisible, but expensive electrostatic damage.
NEWS
GET SERVICE
With quality parts to meet every budget and friendly staff trained to make your visit informative and hassle free.