
how to clean a cricut mat

how to clean a cricut mat
One of the key accessories is cricut cutting mats, leading to accurate cutting and successful crafting. You can use a Cricut mat with vinyl, cardstock, paper, fabric or any specialty materials and a clean mat will help to ensure adhesion, smooth cutting and quality crafting.
Cricut mats pick up glue, pet fur, glitter, paper fibers and dust over time. Over time, the mat becomes less sticky and materials tend to move when cutting, resulting in inaccurate cuts. The good news is that a regular cleaning schedule can bring many of the benefits of new grips to a mat, and will greatly lengthen the useful life of a mat.
You will find out how to do a safe cleaning of the Cricut mat, when to perform the cleaning and what are the best cleaning techniques to keep the Cricut mats in excellent condition for all your projects.
Why Cleaning Your Cricut Mat Is Important
Each Cricut mat comes with a unique adhesive surface to keep material in place during cutting. The glueing action lessens as dirt and debris build up.
There are multiple benefits of regular cleaning:
- Restores mat stickiness
- Improves cutting accuracy
- Prevents material shifting
- Extends mat lifespan
- Reduces replacement costs
- Maintains consistent project quality
Some crafters will replace mats before they were ready to be cleaned due to a simple cleaning process.
Signs Your Cricut Mat Needs Cleaning
Don't know if your mat's in need of help? Look for any of the following indications:
Materials Won't Stay in Place
If paper, vinyl or card stock are lifted as they are cut, dust and debris may be clogging up the adhesive.
Visible Debris on the Surface
All lint, paper fibres, glitter and small pieces of material stick together with repeated use.
Uneven Stickiness
Some parts may still be clingy or smooth or slippery.
Cutting Errors
When operating the equipment, the materials may shift, leading to cuts out of alignment or damaged designs.
Difficulty Removing Materials
In some cases, built-up residue can cause woolen joints or make it difficult to get rid of the project.
Supplies You'll Need
To clean the mat on your Cricut, you'll need the following supplies:
- Plastic scraper or Cricut scraper tool
- Lint-free cloth
- Mild dish soap
- Warm water
- Soft sponge
- Baby wipes (alcohol-free)
- Tweezers
- Paper towels
Do not use abrasive brushes, strong solvents or harsh chemicals that will harm the adhesive layer.
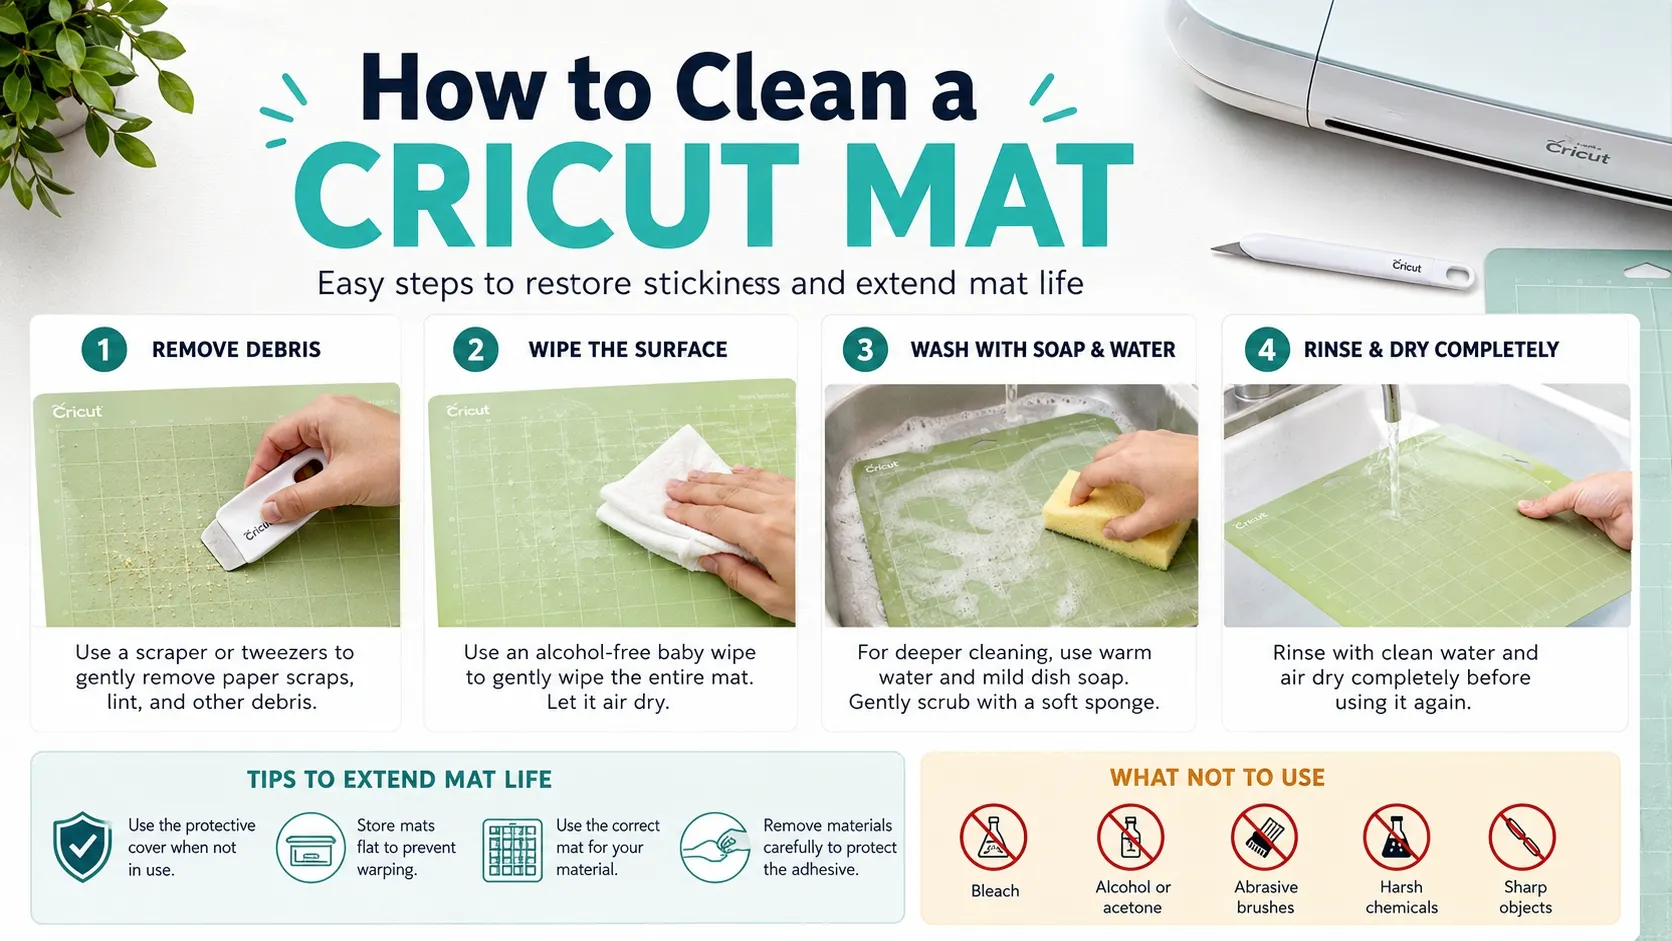
Method 1: Quick Cleaning with a Scraper
This is the quickest and the safest maintenance system.
Step 1: Remove Loose Debris
Gently remove paper scraps, vinyl pieces and lint with the Cricut scraper tool.
Step 2: Lift Stubborn Fibers
Remove small particles embedded in adhesive surface using tweezers.
Step 3: Replace the Protective Cover
Once its cleaned, put the clear protective sheet back on the mat so that it doesn't glean dust.
This is a speedup cleaning solution which is recommended to be carried out after each project to ensure best operation.
Method 2: Clean with Baby Wipes
For lights to medium soiling, baby wipes is a convenient option.
Step 1: Choose Alcohol-Free Wipes
Alcohol-based wipes may weaken the adhesive layer. Select gentle, fragrance-free baby wipes whenever possible.
Step 2: Wipe the Surface
Using gentle circular motions, wipe the entire mat.
Step 3: Allow to Dry
Let the mat air dry completely. As moisture evaporates, some of the adhesive grip may return.
This method is ideal for weekly maintenance and routine cleaning.
Method 3: Wash with Soap and Water
When the mat has significant debris buildup, a deeper cleaning may be necessary.
Step 1: Prepare Warm Soapy Water
Mix a few drops of mild dish soap into warm water.
Step 2: Gently Wash the Mat
Use a soft sponge or lint-free cloth to clean the surface.
Avoid aggressive scrubbing, which may damage the adhesive coating.
Step 3: Rinse Carefully
Lightly rinse the mat under lukewarm water.
Step 4: Air Dry
Lay the mat flat and allow it to dry naturally.
As the water evaporates, the adhesive layer often regains much of its original tackiness.
Method 4: Deep Cleaning for Heavily Used Mats
Professional crafters who use their Cricut machines frequently may need occasional deep cleaning.
Step 1: Remove Surface Debris
Start by scraping away visible particles.
Step 2: Wash Thoroughly
Use mild soap and warm water to clean the entire mat.
Step 3: Inspect Adhesive Areas
Check for stubborn residue and gently remove remaining particles.
Step 4: Dry Completely
Allow the mat to dry for several hours before use.
Deep cleaning is particularly useful for mats exposed to paper fibers, fabric lint, or glitter materials.
What Not to Use on a Cricut Mat
Some cleaning products can permanently damage the adhesive layer.
Avoid:
- Bleach
- Acetone
- Nail polish remover
- Strong household cleaners
- Alcohol-based solvents
- Abrasive scrubbing pads
- Wire brushes
These products may strip away adhesive and shorten the mat's lifespan.
How Often Should You Clean a Cricut Mat?
Cleaning frequency depends on how often you craft and what materials you use.
Light Users
Clean every few weeks or after several projects.
Moderate Users
Perform quick cleaning after each project and wash monthly.
Heavy Users
Clean weekly and deep-clean as needed.
Materials such as cardstock, felt, fabric, and glitter paper often require more frequent maintenance because they leave behind more debris.
Tips to Make Your Cricut Mat Last Longer
Proper care can dramatically increase mat longevity.
Always Use the Protective Cover
The clear cover prevents dust and dirt from settling on the adhesive surface.
Store Mats Flat
Avoid bending or rolling mats, which can cause warping.
Use the Correct Mat Type
Different materials require different Cricut mats:
- LightGrip Mat
- StandardGrip Mat
- StrongGrip Mat
- FabricGrip Mat
Using the correct mat reduces unnecessary wear.
Remove Materials Carefully
Peel the mat away from the material rather than pulling the material upward. This helps preserve both the project and the adhesive layer.
Keep Craft Areas Clean
A cleaner workspace means less dust and debris transfer onto your cutting mat.
Can You Restick a Cricut Mat?
All Cricut mats have a finite amount of stick, and they will eventually lose it altogether. Some people decide to spray again with adhesive sprays or special adhesive repositioners.
Generally resticking of the plan should be looked upon as a last resort, however. sometimes proper cleaning allows enough grip to be re-established and the store safely used again.
When a mat can't be cleaned after several times, sometimes it's only a mat replacement that can prove to be a better solution.
When Should You Replace Your Cricut Mat?
Even with excellent maintenance, mats eventually wear out.
Consider replacement if:
- Adhesive no longer returns after cleaning
- Surface becomes damaged or torn
- Cuts become consistently inaccurate
- Mat warps significantly
Replacing worn mats ensures consistent cutting quality and reduces project frustration.
Final Thoughts
Ordering a Cricut mat is a crucial step for any Cricut Maker, mainly since you need to know the way to clean it. Regular maintenance eliminates dust, paper fibres and adhesive residues and aids in restoring the mat's natural grip. Cleaning regularly with a plain scanner, baby wipes or soap and water will lengthen the lifespan of your mat and help to improve cutting accuracy.
With proper cleaning and storage techniques, you will be able to make the most of your Cricut mats and save money on replacements, while ensuring your crafting experience for years to come is smooth sailing.
NEWS
GET SERVICE
With quality parts to meet every budget and friendly staff trained to make your visit informative and hassle free.